So first I guess I'd better tell you a little about the voluntary work, basically I run an Art workshop alongside a theatre group once a week, we take kids between the ages of 13 & 19, some of which are youth offenders, kids in foster care etc
At the moment I am leading the kids towards making all the props, scenery and costumes for the production that the theatre group are performing in July.
As part of getting them to think about making 3d structures, I have set a few small tasks like making small boxes, paper gift bags etc
The challenge for tomorrow is that the kids bring in a flower that they've made out of paper.......
Now, the kids never let me off so I always have to take part to.
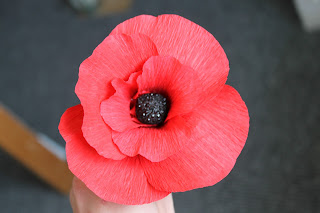
So here is my paper poppy:
 |
| Sits nicely with my paint brushes!! |
 |
| paper poppy |
Things I used:
 |
| Equipment |
Green florist wire
Green florist tape
Black Button
Card
Corrugated card
Glue gun
Circle templates
Scissors
Hole making device (I used my dremel)
Pencil
Step 1
Using card I made 2 petal templates, 1 small one for the inner petals and 1 for the larger outer petals
Now using the corrugated card I drew 3 circles the size of the button, 2 slightly smaller circles, and 2 slightly smaller again:
 |
| Templates |
 |
| Circles stacked and glued |
 |
| Wire threaded through and glued |
Next I cut out my petals, I cut 3 smaller petals and 4 of the larger size
Now its important to lay the petals in line with the grain of the crepe paper so that it runs from the top to the bottom of the petal:
 |
| Remember to lay it on the grain!! |
 |
| Glue around the card stack |
 |
| All the petals are glued |
Then I shaped my petals from the outside in, now to do this I gently stretched along the edges of my petals and stretched the centre area of the petal out, as shown on the diagram:
 |
| Stretch the crepe paper |
 |
| Petal taking shape |
 |
| All the petals have been shaped and the button is glued in |
And to finish off I wrapped florist tape from the base of the flower down onto the stem:
 |
| Finished off with florists tape |
 |
| Tah Dah! |
I must say I'm pleased with the outcome, so much so I am off to reward myself with a nice cup of tea, and possibly an early easter egg!!
Until next time x
Hi Nina, welcome to blogworld. And what a way to start. You've made it look so easy.
ReplyDeleteAnji x
Thanks for taking the time to show us this tutorial. Lovely poppy and could be made in other colours as well. Brilliant.
ReplyDeleteThank you for the lovely welcome! Give the poppy's a go.....they look easy because they are easy! x
ReplyDeleteWelcome to blogland - you will find yourself in here a lot! Fabulous tutorial and brilliant second post (hard to believe!). Have alovely Easter.
ReplyDeleteJo x
Your poppy is beautiful - one of my favourite flowers, and this is so life-like. Another great blog post - it's easy really isn't it? And great fun when you get going. Have a great week.
ReplyDeleteYour blog is beautiful and your flower is really good
ReplyDeletewelcome to blogging
p.s Can you look at my blog at jacintaslearningportfolio
Thank You